Inventory: Setting Up & Doing Take Inventory
Once the decisions are made the settings need to be done correctly and we suggest you get assistance from S2k on all of these.
The steps should be as follows:
1) Get all invoices into S2k, if you have an electronic (EDI) vendor get as many old copies of these invoices as you can.
2) Scan the entire store by section and setup these items with the correct retail and cost. If cost is not known, then leave it at zero and s2k can apply a % cost to all the departments based on the profit in each dept. Ask S2k tech to use the FIX $0 COST ITEMS UTILITY.
3) with assistance of S2k tech, we will Setup default department % profits, the tolerance level and if you are going to inventory all departments or just specific departments.
4) Make certain that all the end of day reports are coming over, checking what % of your daily sales are actually scanning. This is shown on the first page of s2k. You need to be as close to 100% as possible.
5) Do a test "Take Inventory" with a few items or one dept to check you understand how S2k works.
6) You will do a complete store take inventory preferable at night or before you open so get your starting inventory into S2k to make sure all the levels have an accurate starting point and sync the Handheld with S2k and make certain the data looks right once it gets to S2k. Make certain that the dates are all the same. S2k has a feature to fix the dates if the inventory was taken over midnight so some items we done on one day and some on another.
7) After
taking inventory with the Handheld (see take inventory with handheld for
instructions on using the handheld), sync with S2k on the cradle. Then go to
INVENTORY menu and choose TAKE INVENTORY BY SKU, select the station at the top
you wish to edit to see the results of your scan. 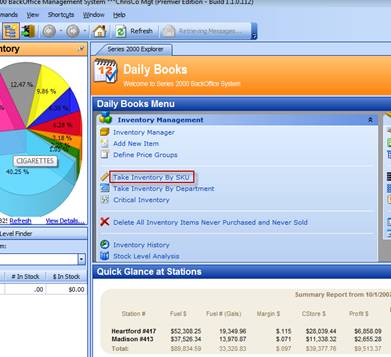
View the Take Inventory report to see if it is correct and review again if it is not. Editing can be done on the Take Inventory screen.
8) Click on the option “Total Inventory Taken for” for any dept that you scanned completely as this will zero out any items NOT scanned for all departments. You also have the option to view your lists by dragging and dropping the header to the line above, take a look at the Category, that header was dragged to the top area and then S2k sorted and grouped all the Categories together. This can be done with ANY header.
9) Enter the "Take Date" for all items. Make sure you follow the specs under IMPORTANT on the left to decide which day to enter
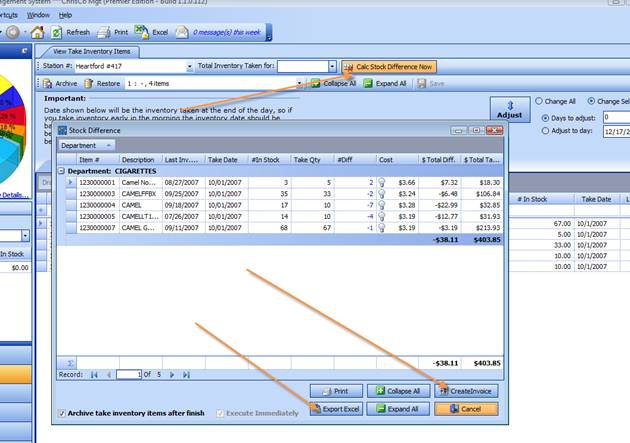
10) Then click on the “Calc Stock Difference Now” button. This will create a list which shows any differences between what S2k shows in stock and what you actually took. It will also zero out any items that are showing a negative or positive total in stock. If you accept this report then click on process and S2k will create what we call a TI Invoice (Take Inventory Invoice) this will then correct inventory using the numbers in this invoice to adjust inventory per your scanned list.
11) From here you can accept the changes and click on "Create Invoice" to make the final adjustment, this will take a few moments and you will see another screen pop up with a blue "!" when complete, or you can hit cancel to make adjustments and try again. NOTE: you can also export this screen to excel or Print.
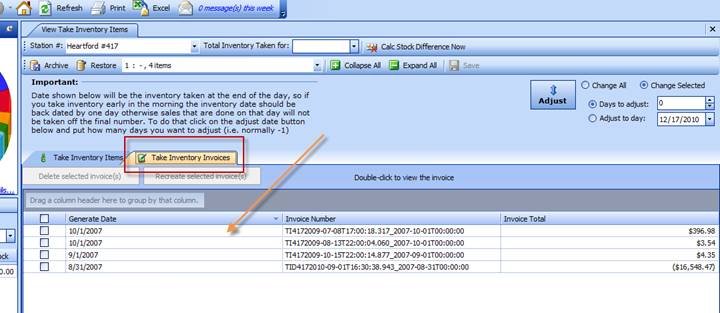
12) Once the adjustment is made you can view the adjustment under the TI Invoice tab, you can double click on an adjustment to generate a report to see the inventory adjustments that were made, you can also delete the adjustment if you need to edit by checkmarking the item and clicking on "Delete Selected Invoice"
To view a list of Itemized History go to reports and under
Non-Fuel Inventory click on Inventory history and click on the
StationID/Date/Departments. This will show you a report that looks like
this:
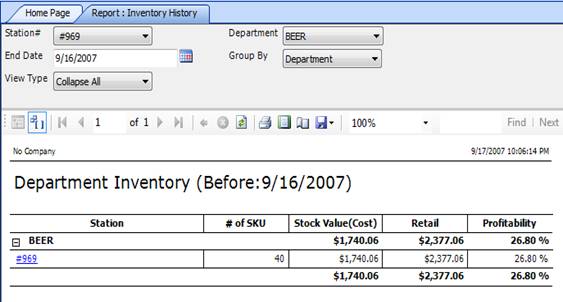
Then by
clicking on the StationID in blue you will see a complete list of all items for
that dept: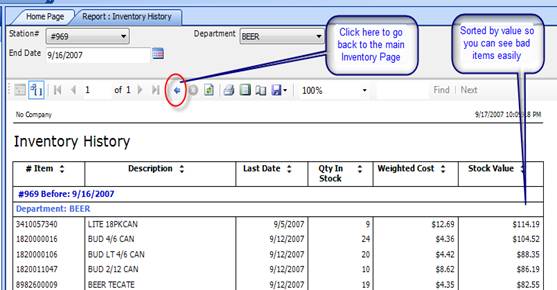
As always you can
use the blue disk icon to save to Excel for any custom work you want to do.

